
Hand Dyed Yarn How-To

Never in a million years did I actually think I’d take the time to dye my own yarn. I’ve spent hours browsing through beautiful hand-dyed yarn and admiring their unique colorways, but always thought it was best left to the pros. Lo and behold, my May KnitCrate arrived, complete with a how-to starter kit to dye some wool with Kool-Aid.

Starter Kit
My May 2020 KnitCrate came with 2 hanks of Superwash Merino Wool in Fingering weight by Dyer Supplier + 2 packets of Kool-Aid in Cherry and Orange.
The yarn was so beautiful, I did actually contemplate keeping it as its natural state. But really, why not have a little fun? I told myself that if it turned out super ugly, I could just dye it a really dark solid color and call it a day. Let’s get to the fun part!
Here’s what you’ll need:

Un-dyed natural fiber yarn
Large pot & large strainer (& a small strainer if using Icing colors)
White vinegar
Kool-Aid and/or Wilton Icing Colors (I used both)
Small bowls for separating dye colors & microwave-safe regular bowl
Measuring spoons & regular kitchen spoon
Plastic wrap
Bath towel (one you’re not afraid to possible get food coloring on)
Drying rack/hanger
Step 1: Soak your yarn

Once you’ve gathered all your materials, pour 8 cups of water and 3 tablespoons of white vinegar into your pot (this is the amount needed for 2 hank at approximately 830 yards of yarn). Loosen your yarn so that it can evenly soak (if it’s braided into a hank, pull it apart and make sure it has ties to keep it together). Let your yarn soak for at least 30 minutes at room temperature. This gives the yarn enough time to fully soak so that it can accept the pigment. You can use this time to prep your kitchen (pour any Kool Aid into bowls, pick out your icing colors and blends.
Step 2: Icing Dye (Solid base color)
From here, remove your yarn from the pot and squeeze out most of the water (don’t empty your pot yet!). I used my pasta colander as a safe way to squeeze the yarn without wringing it and risking it getting tangled. I decided that I didn’t want my yarn to be predominantly red or orange, which are the only colors I got from the Kool-Aid packets, so I used the Wilton’s Icing to dye the yarn a base layer blue. I used the Sky Blue color, starting with about 1/4 teaspoon and mixing it into the pot of water/vinegar. For this part, I really just kind of winged it until I got the color I wanted. These gel colors are pretty pigmented, so you won’t need much. While mixing the color, keep an eye out for excess icing chunks that don’t dissolve properly. I scooped them out with my small strainer. If you’re ok with a less even color spread or streaks of darker color, you can leave them in.


Once you’re happy with the color, drop that yarn in!
Use a spoon to submerge the yarn and gently stir, making sure to mix the color as evenly as you can. The yarn will soak up the pigment quickly (the vinegar helps lock the color into the fibers), so try to distribute the yarn evenly and don’t neglect any parts of the yarn. Pay special attention to any areas that are tied to keep the yarn together - depending on how tightly these are tied, it might prevent that area from soaking up the pigment unless you loosed it while you mix.


Once you can scoop out water with your spoon that runs clear, the yarn is done and all the color should be soaked. At this point, turn on the heat and let the water heat to just before boiling. Once you see bubbles form, reduce the heat to low and let it sit for 20 minutes. Heating it up helps to set the yarn!
After 20 minutes, turn off the heat and let the water cool completely. Once cool, gently pull the yarn out and wash it. I used a natural clear dish soap mixed in a few cups of water, back in the same pot from before (cleaned out, of course). Just push this through the water a bit, then rinse it in water and gently squeeze out excess water. The yarn should be damp, but not dripping. I put each hank on opposite sides of an old bath towel and gently rolled each side up to pull out excess water without tangling the yarn.


If you just wanted a solid color, you’re done! I really liked the blue, but decided that it would be way more fun with some speckles, courtesy of the red and orange Kool-Aid packets I received.
Step 3: Kool-Aid Dye (Speckles)
Next, lay out a sheet or two of plastic wrap onto a countertop or large surface. Lay out your yarn, trying to gently spread out the fibers as much as you can to evenly distribute your color. You can see how rich the blue tones are on the yarn - but also take notice at the unevenness of the color distribution. Some areas are much lighter while others are much darker. I personally love that about hand-dyed yarn, so I’m happy.

Once your yarn is laid out, pour each Kool-Aid packet into its own bowl. I decided I wanted to gently speckle my yarn with lots of small flecks of color, so I literally grabbed a pinch of one color and dusted it on top of the yarn, almost how you would salt a dish. If you do this method with multiple colors like I did, make sure to use a different hand for each color so you don’t accidentally blend them before they contact the yarn. Keep doing this until you get results you’re happy with, but make sure you keep enough on hand to flip the yarn over and do the same on the other side. I flipped it over 3 or 4 times to make sure I got speckles all over.


At this stage, you’d normally be ready to heat set this and get it drying, but it wasn’t quite where I wanted it yet. After adding the speckles, I felt like the yarn was way too blue, and I wanted a little more of a robin’s egg, ocean-y aqua . Luckily, I had a decent amount of the orange Kool-Aid left, which I noticed was drying yellow - just what I needed to bring in those aqua tones.
I went ahead and did another water/vinegar solution in the pot and threw in the rest of the orange Kool-Aid, blending it until fully dissolved. With that, I threw the yarn back in and mixed it back up!

Much Better!
Adding in a little bit of yellow helped to bring out more of the aqua, coral reef vibes I was hoping for.
Step 4: Heat & Dry
When I achieved the color I wanted, I pulled the yarn back out and squeezed out the water again using the same towel roll method. Since I used Kool-Aid here, I wanted to follow the final heat set method for that, which involves -gasp- microwaving it.
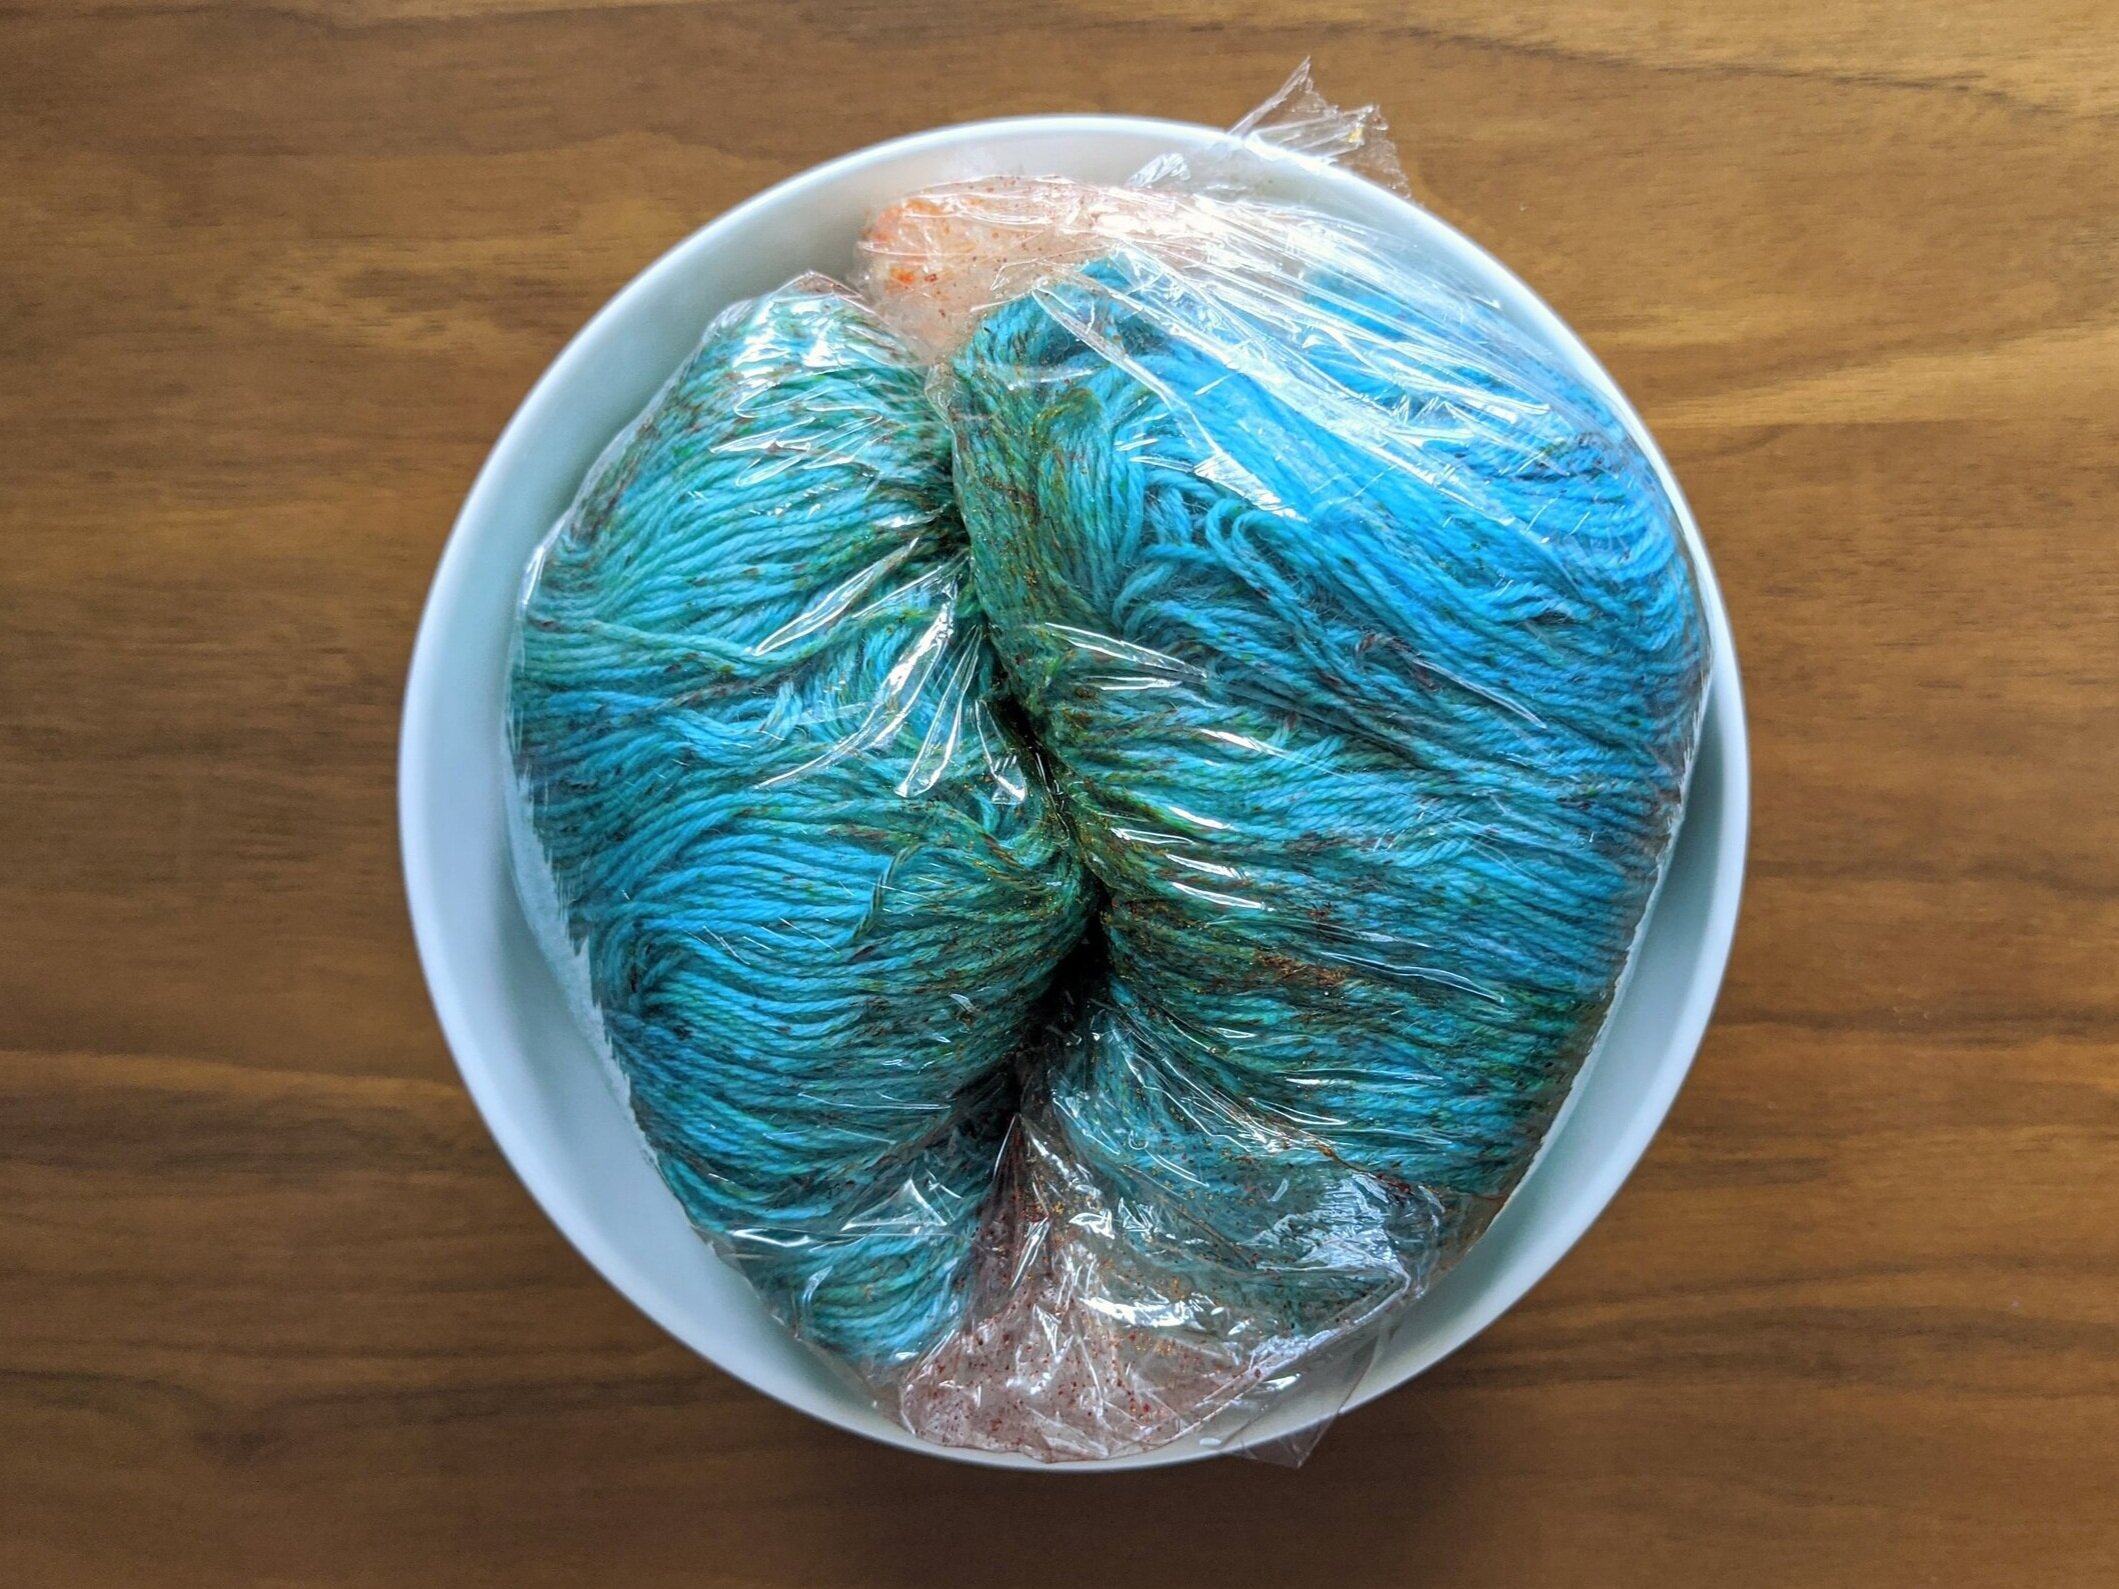
Once the yarn is dry enough to lay back out, place it back on the plastic wrap, and then roll it up, like a jelly roll. Now you can twist it up a bit to get it to fit into your microwave-safe bowl. Then throw it into the microwave, on high, for about 4 minutes, stopping it halfway to adjust and keep from overheating. After your final heat-set, pull it out of the microwave and let it cool. It will be super hot, so let it sit!
When the plastic roll is cool to the touch, gently unroll the yarn and remove the plastic wrap, careful not to tangle.


Thought you were done? Nope - not yet. But you’re super close!
Since Kool-Aid is technically food powder, you definitely want to wash that (and all the sugar) off of your yarn. Repeat the same steps as above, gently washing in a pot of water with a small amount of clear natural dish soap. Rinse that baby out and repeat the towel dry process to get it as dry as possible. It’s time to let it dry!

Let it dry
Natural fibers need time to dry, and sometimes that means helping them along. Flipping the yarn every few hours and squeezing out excess water from the bottom helps to speed up the process.
Unfortunately, my drying rack was preoccupied with clothes, so I opted to use my over-the-door towel hanger, which worked like a charm. It did tend to pool water toward the bottom of the yarn after a few hours, so I made sure to squeeze it out and flip the position occasionally for an even dry. Also, it smelled like wet dog. A lot.
But then one morning I woke up and it was dry, and the smell was completely gone! I’d say it took a good 2-3 days to dry fully, and once it did, wowza. I have to say, it turned out SO MUCH BETTER than I expected. I guess I had really low expectations to begin with, but I was really impressed. I’ve admired colorways like this on Etsy for years, and I just made my own with some icing gel and a couple packets of Kool-Aid.
Check out the final results below, all pretty and twisted back up into presentable hanks!
